Crochet is an easy craft to learn and you only need to learn a few basic stitches to make a variety of items. When you want to learn how to crochet for beginners and you have made some sample pieces practicing the basic stitches in rows, you might want to crochet in rounds or circles and also squares and rectangles.
Look out for the crochet patterns for free at the end of the page, together with a list of abbreviations that are used in this post.
Decreasing and increasing
Decreasing in a row: to decrease 1 single crochet (sc), work off 2 sc as 1 sc, 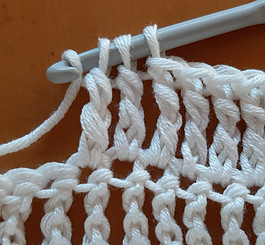 So, to work off 2 sc as 1 sc, insert the hook from the front under the top loops of the next sc and pull through. Insert the hook again from the front under the top loops of the following sc, and pull through. There are 3 loops on the hook. Yarn over and draw through all 3 loops on the hook.
Increasing in a row: increasing is needed when making rounds or squares, and also to shape garments and accessories. To increase, you make 2 or more stitches in the same stitch.
When you see “join”, a slip stitch is made to join.
Follow these step by step instructions to practice basic stitches in rounds and squares.
Making a Circle in Single Crochet
This pattern is perfect for making a potholder: 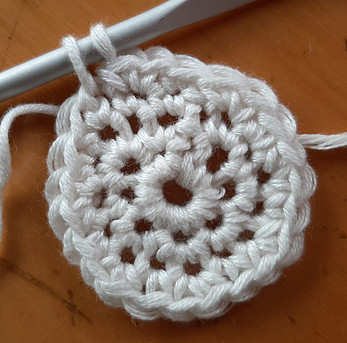
Make a chain with 4 stitches and join with a slip stitch to form a ring. To form a circle one needs to increase stitches in each round. When making 2 sc in a sc, you are increasing to have the circle staying flat.
- 1st rnd: make 8 sc in the ring. Mark the end of each round with a safety pin in the last sc of the rnd. Join
- 2nd rnd: make 2 sc in each sc of the previous row so that there are 16sc in the rnd. Join
- 3rd rnd: * 2sc in next sc, sc in next sc. Repeat from * around so 24 sc in the rnd. Join
- 4th rnd: * sc in next 2sc, 2sc in next sc. Repeat from * around so 32 sc in the rnd. Join
- 5th rnd: * sc in next 3 sc, 2sc in next sc. Repeat from * around, so 40 sc in the rnd. Join
- 6th rnd: sc in each sc around. Sl st in next 2 sc. Break off.
An idea for crochet patterns for free, is to make a potholder from this single crochet. Just continue with the same sequence of stitches until you have reached the size you would like your potholder to be. Use an eco friendly yarn like organic cotton or bamboo to help the environment at the same time.
Making a Square in Single Crochet 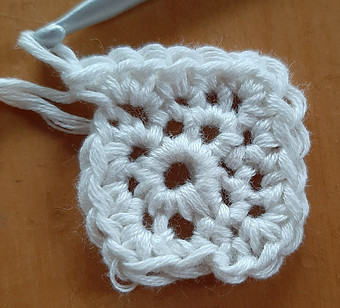
Make a chain with 4 stitches and join with a slip stitch to form a ring.
- 1st rnd: 8 sc in the ring. Mark the end of the rnd with a safety pin.
- 2nd rnd: * 3 sc in the next sc, sc in the next sc. Repeat around. So 1sc has been increased on each side of the corner sc. The corner sc is the center sc of the 3sc. Join
- 3rd rnd: * sc in next sc, 3sc in next sc (corner is the center sc 3 sc group), sc in next 2 sc. Repeat from * around. Join
- 4th rnd: * sc in next 2 sc, 3 sc in next sc (to form the corner) sc in next 3 sc. Repeat from * around. Join
- 5th rnd: * sc in next 3 sc, 3 sc in next sc (center stitch ) sc in next 4 sc. Repeat from * around. Join
- 6th rnd: * sc in next 4 sc, 3 sc in next sc (center stitch ) sc in next 5 sc. Repeat from * around. Join
Making a Circle in Double Crochet (dc)
Make a chain with 4 stitches and join with a slip stitch in the first ch to form a ring. 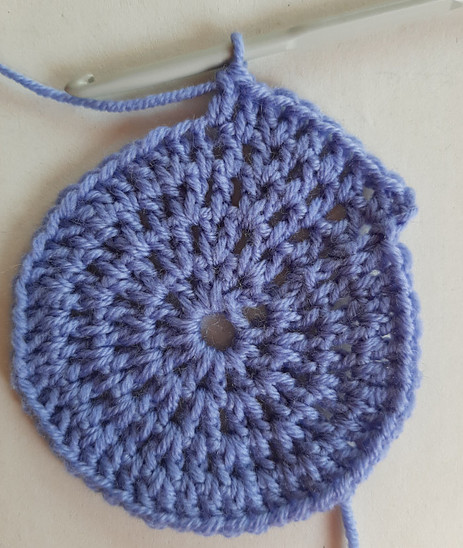 To form a circle one needs to increase stitches in each round. When making 2 dc in a dc, you are increasing to have the work staying flat.
- 1st rnd: ch 3, make 9 dc in the ring. The ch 3 counts as the 1st dc. Join with a sl st in the top of the starting ch 3.
- 2nd rnd: ch 3, dc in joining, make 2 dc in each dc of the previous row so that there are 20 dc in the rnd. Join
- 3rd rnd: ch 3 * 2 dc in next sc, dc in next dc. Repeat from * around so 30 dc in the rnd. Join
- 4th rnd: ch 3, dc in the joining, * dc in next 2 dc, 2 dc in next dc. Repeat from * around so 40 dc in the rnd. Join
- 5th rnd: ch 3, dc in the joining * dc in next 3 dc, 2 dc in next dc. Repeat from * around, so 50 dc in the rnd. Join
Continue in the same way, while increasing 10 dc evenly around to keep the work flat. Try not to let the increases fall over one another. Break off.
How to crochet circles in other sizes –
- rnd 1: begin with a specific amount of stitches.
- rnd 2: regardless of the type of stitch you are using, sc, hdc, dc etc., make 2 of each stitch in each one, so double the stitches in the second round.
- rnd 3: with a ratio of 1 to 2 (eg 1 dc, 2 dc in next st) that you use throughout the round.
- rnd 4: ratio of 2 to 2 (eg 2 dc, 2 in next st) and repeat throughout the round.
- rnd 5: ratio of 3 to 2 (eg 3 dc, 2 dc in next st) and repeat.
- rnd 6: ratio of 4 to 2 (eg 4 dc, 2 dc in next st) and repeat.
Continue in the same ratios for every subsequent round until you have reached the desired size.
Making a Square in Double Crochet
Make a chain with 4 stitches and join with a slip stitch in the first ch to form a ring. 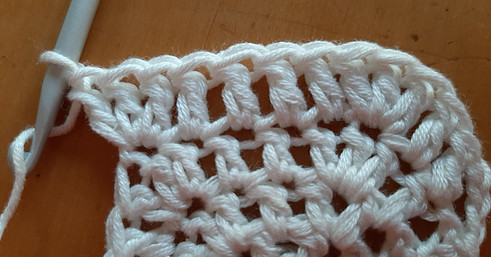
- 1st rnd: ch 3, 7 dc in the ring. Join in 3rd chain.
- 2nd rnd: ch 3 * 3 dc in the next dc, dc in the next dc. Repeat around. So 1dc has been increased on each side of the corner dc. The corner dc is the center dc of the 3 dc. Join in 3rd ch.
- 3rd rnd: ch 3, dc in next dc, * 3 dc in next dc (corner is the center dc in the 3 dc group), dc in next 2 dc. Repeat from * around. Join in 3rd chain.
- 4th rnd: ch 3, dc in next 2 dc, * 3 dc in next dc (to form the corner) dc in next 3 dc. Repeat from * around. Join in 3rd chain.
- 5th rnd: ch 3, dc in next 3 dc, * 3 dc in next dc (center stitch ) dc in next 4 dc. Repeat from * around. Join in 3rd chain.
- 6th rnd: ch 3, dc in next 4 dc, * 3 dc in next dc (center stitch ) dc in next 5 dc. Repeat from * around. Join in 3rd chain.
Continue in the same way with maintaining the corner until the desired size has been reached. To finish: sl st in next 2 dc and break off yarn.
Squares are ideal to use to make a blanket and are often part of crochet patterns for free. Lots of variety is possible with different colors and stitches and is a popular choice when you learn how to crochet for beginners.
Making a Rectangle in Double Crochet
Make a chain with 6 stitches and join with a slip stitch in the first ch to form a ring.
- 1st rnd: ch 3 and 13 dc in the ring. Join in 3rd chain.
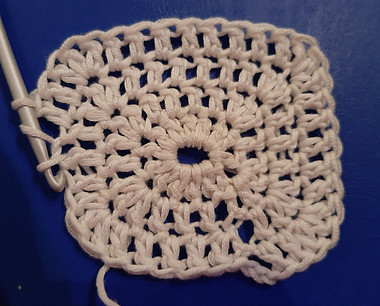
- 2nd rnd: ch 3, * 3 dc in the next dc, dc in the next dc, 3 dc in the next dc, dc in the next 4 dc. Repeat around but finally dc in next 3 . So 1dc has been increased on each side of the corner dc. The corner dc is the center dc of the 3 dc. Join in 3rd chain.
- 3rd rnd: ch 3, dc in next dc, * 3 dc in next dc (corner is the center dc 3 dc group), dc in next 3 dc, 3 dc in next dc, dc in next 6 dc. Repeat from * around and finally dc in 5 dc. Join in the 3rd chain.
- 4th rnd: ch 3, dc in next 2 dc, * 3 dc in next dc (to form the corner) dc in next 5 dc, 3 dc in next dc, dc in next 8 dc. Repeat from * around and finally dc in 7 dc. Join in the 3rd chain.
- 5th rnd: ch 3, dc in next 3 dc, * 3 dc in next dc, dc in next 7 dc, 3 dc in next dc (center stitch ) dc in next 10 dc. Repeat from * around. Join in the 3rd chain.
- 6th rnd: dc 3, dc in next 4 dc, * 3 dc in next dc, dc in next 9 dc, 3 sc in next dc (center stitch ) dc in next 12 dc. Repeat from * around. Join in the 3rd chain.
Continue in the same way with maintaining the corners until the desired size has been reached. To finish: sl st in next 2 dc and break off yarn.
Abbreviations
These are some of the most common abbreviations that are used and you will come across in this post.
- ch = chain stitch
- dc = double crochet
- dec = decrease
- d tr = double treble
- h dc = h double crochet
- incl = inclusive
- inc = increase
- rnd = round
- sc = single crochet
- sl st = slip stitch
- st and sts = stitch and stitches
- tr = treble
- tr tr = triple treble
Crochet Patterns for Free – Double Crochet Scarf
Try the easy and quick crochet patterns for free to make this scarf. It is very simple and you only need to know two basic stitches to follow this easy pattern for beginners. You will find a big selection of yarns and hooks here at Knitpicks.
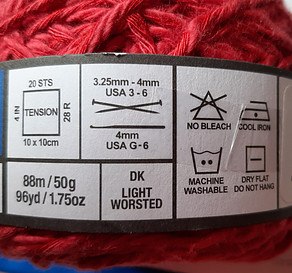
I used a Double Knit and a 4 mm hook (USA G-6). 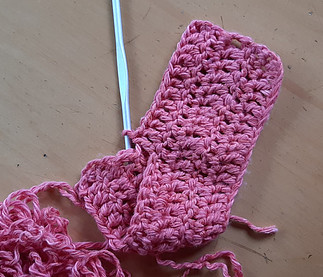 Depending on how long you would like your scarf to be, 1 ball will make short scarf and with 2 balls you can create a longer scarf.
To start: make a chain with 40 stitches.
- Row 1: dc in the third chain from the hook and in every chain across, ch 3 and turn. You should have 38 dc across plus the beginning chain, to give you a total of 39 dc.
- Row 2: 1 dc in the next dc and across the entire row, ch 3 and turn. (39 dc)
- Repeat row 2 for all subsequent rows until you have reached the desired length. Make sure at the end of each row that you have 39 dc.
- Do not ch 3 at the end of the final row, but break off and work away the end.
Remember that when you turn for the new row, you always start with the second or subsequent stitch in a row, because the turning chain counts as the first stitch. Two mistakes that people often make when they learn how to crochet, are these:
-
- to start in the 1st stitch,
- and to forget the last stitch.
If you want, you can add tassels at the ends of the scarf.
We Crochet has a huge selection of beautiful yarns at very affordable and competitive prices. Their products for crafters include kits and gift ideas for crafters.
There is also a big variety of hooks and yarns available on Amazon.
If you want to refresh your memory about basic stitches, check out this post on learn how to crochet for beginners.
Advanced crochet stitches normally build on the basic crochet stitches. This could be that multiple stitches are worked into the same stitch, or multiple stitches could be worked across several stitches to create a special stitch. Add texture to your project with these special textured stiches.
I hope these basic stitches will help you learn how to crochet for beginners, but if you do have any questions or comments, please leave them below and I will get back to you.

This is the perfect time for me to learn how to crochet with basic stitches. I’m not working right now so making a few pot holders would be perfect for me to start with. You explain this easily and I’ll have to come back after I get the supplies you suggested. Thank you for sharing. This is very helpful.
Potholders are perfect when you are learning basic stitches, and even when you are experienced, there are many smaller items one can still make. Let me know if you need help!
This actually a great lesson learned, especially when you are really curious about how to learn on how to crochet. The lesson is quite educating and gives you the inspiration need, due to the fact that all the right up is been elaborated step by step, so with this you can be able to bring your crochet weaving to a perfect finish, even if not but almost
Thank you and good to know you find it informative. Please let me know if you need help in any way.
A marvelous article which I read with great interest.
I think that we should really bring back making things for ourselves so your crochet patterns are appropriate. You have given us so many patterns and how to knowledge to be able to crochet so many different pieces for ourselves.
It is great to be more creative at a time when people want to learn more and do things for themselves.
I will definitely be giving this a try as it reminds me of my child hood when I used to make things with my mother.
Thank you
Imelda
Crochet is such a great craft and hobby and really relaxes the mind and body and actually very easy to learn. I am sure you will love it and I am here if you need help.
Crocheting is a fun and its also a precess that helps you learn how to makes various items that can be useful in your homes. On this article you will be thought how to increase or decrease crochet on making squares or circles in making various pattern..
At a time like this where eventually everyone is indoors is an opportunity for you to learn some hand crafts and crocheting could be one of them. So take your time go through this article and learn all you need to know about crocheting
Hi Evans, you are right that it is a good time to learn a new skill and crochet is not only fun, but also relaxed the mind and is one of the meditative crafts.
I have to say that the square form is the one giving me a hard time right now. Do I make the 4 stitches in the same place? Or is it 4 successive stitches?
Also for a double crochet scarf, Do I make the chain as long as I want my scarf? Or the chain of 40 is the standard? Because I would like to have a long scarf for me and small ones for my nieces.
Thanks
Hi there, the chain is the width of the scarf, so in the Double Knit yarn that I used, 40 chain stitches gave me a scarf with a width of 19 cm. If you want it to be wider you can make the cahin longer with more stitches. The length you make as long as you want it to be.
I am not sure what you mean by the 4 stitches in the same place on the square, so please give me some more details and I can help you.
Oh this is fantastic! I wrote down the abbreviations so I can quickly scan through the basic stitches you explained. My mom crochets quite a lot, she made me beanies using double crochet circle. I never understood before how she does it, and she never really took her time to explain it to me.
Since we have so much time now, we’re learning together and this is super helpful for when she doesn’t have time to crochet with me 🙂
Which of this stitches would you recommend for sleeping socks?
Thanks,
Katya
Hi Katya, this is great that you have the time now to learn how to crochet with basic stitches. I would use either half double crochet or double crochet to make bedsocks. I do have crochet patterns for free so let me know if you would like one for bedsocks.
Personally, I found this post to be a lot of benefits not just to Me but in a lot of things. Personally, this is great and thank you for sharing here. Crocheting is a skill that demands creativity and though I just started learning, I have learnt well from this post too and I will try to practise the things I have learnt in here. Thank you so much
Hi Ella, crochet is good to relax the mind and body and a craft that is very portable. I am sure you will enjoy to learn how to crochet with basic stitches.
Hello Liné, learning to crochet is something i have loved from a very tender age from watching my mum and sister do it back then. I have always been fascinated by the designs my mum comes up with and how they are used to decorate in the house. My little daughter have grown interest in it and that’s why i am looking for how to make crochet now. I still need to undergo work training to be good in it but i am really grateful for the knowledge gained from this article.
Hi Benson, I learnt how to crochet at a very young age, so this is a good time for your daughter to learn how to crochet with basic stitches. I hope these step by step instructions will help her to start.
Thank you so much for sharing the pattern. I need to cut back on cooking and start a new hobby.The Rectangle in Double Crochet pattern will be perfect for my dinner table. The double knit for the scarf will be useful as well. Will go to order the supplies from Amazon. Cheers to mew hobby!
Hi there, the rectangle in double crochet will be very good as a placemat. You just continue adding rounds until you have reached the size that you need. Enjoy your new hobby.