With these free crochet stitches you will be adding texture to your crochet projects. Advanced crochet stitches is great for meditative crochet and a good way to add to your library of crochet skills.
A list of abbreviations that you will come across in these step be step instructions on how to make these textured crochet stitches, will be found at the end of the post. If you need to refresh your memory on how to do some basic stitches, you will find the details here in learn how to crochet for beginners.
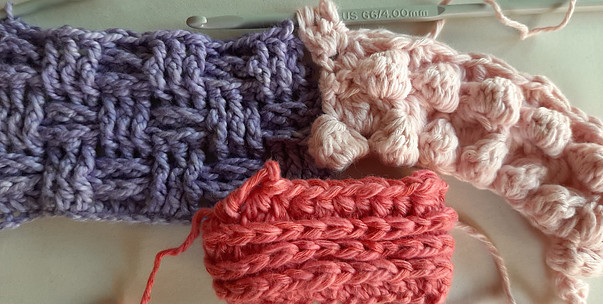 Bobble Stitch
Learning to crochet bobble stitch is easy and will add texture and a three-dimensional feel to your crochet projects. You only need to know how to make a double crochet stitch. It is made with 3,4 or 5 or more incomplete double crochet stitches. It is a flexible stitch and the sizing can be adjusted to make it bigger or smaller. If you need yarns or accessories for you project, please visit KnitPicks here to get the best selection.
The basic idea is that you work several stitches into the same stitch and join them at the top and bottom. Each stitch is started, but do not finish it before you start the next stitch. Finish all the stitches together at the end to create a bobble that is joined together at the top and the bottom.
These step by step instructions are for a 5 dc bobble stitch. Start by making a chain with an odd number of stitches. 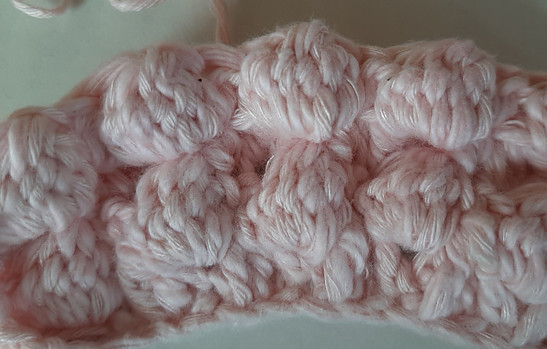
Row 1: yo and insert hook into the fourth stitch from the hook (this will count as the first dc of the row), yo and pull yarn through, yo again and pull through 2 loops on the hook, you now have 2 stitches on the hook.
- Yo and insert the hook into the same stitch, yo and pull yarn through, yo and pull through the first 2 loops on the hook, you now have 3 stitches on the hook.
- Repeat this another 3 times until you have 6 loops on the hook,
- yo and pull through all 6 sts on the hook,
- ch 1 to close and secure the bobble. That makes 1 bobble.
- sc in the next st.
- To make the second bobble, * yo and insert the hook into the next st, yo and pull yarn through, * repeat this 4 times more, each time inserting in the same st, until you have 6 loops on the hook, yo and pull through all 6 loops on the hook, ch 1 to close the bobble. The 2nd bobble is completed.
- sc in the next st.
- Continue along the chain to make a bobble stitch, followed by a sc to the end. Finish with a sc in the last st.
- Ch 1 to turn.
Row 2: sc in the first st which is the ch at the top of the bobble.
- * make a bobble in the sc which is between the bobbles in the row below
- sc in the top of the bobble,
- repeat from * across the row and finish with sc in the last st of the row.
- Ch 1 to turn.
Row 3 and subsequent rows: repeat row 2 until you have reached the required size. Finish with a sc in the last row. Break yarn and work away the ends.
You can use single crochet, double crochet or any stitch, to have different height in the bobble stitch. Width can also be varied by having less or more stitches. If half double crochet is used to make the stitch, it is called Puff Stitch.
Yarn for your projects are available from KnitPicks here at very good prices.
Puff Stitch
A variation of the Bobble stitch is the Puff Stitch. As with many of the advanced stitches, there are several variations of the Puff stitch to make this soft and squishy crocheted fabric. A puff stitch is easy to make and is similar to a half double crochet. But it has more yarn overs and loops, before the yarn is pulled through to complete the stitch.
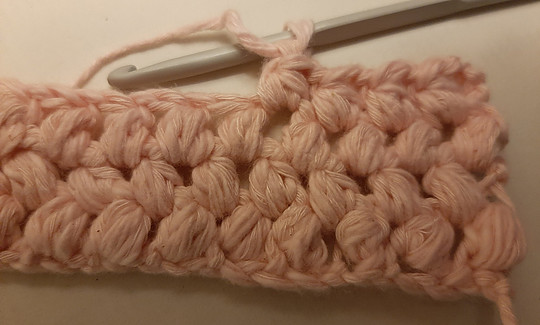
This is the 7 loop version of the puff stitch. To start is the same as hdc with yo and insert the hook into the stitch, yo and pull yarn through.
Without completing the hdc, yo hook again and insert the hook into the same stitch, yo and pull the yarn through, repeat this a 3rd time to have 7 loops on the hook.
To complete the puff stitch, yo and carefully pull the yarn through all 7 loops on the hook.
To make a sample piece, make a chain with an even number of stitches.
- Row 1: make a puff st in the 4th ch from the hook, ch 1, skip the next st, * puff st, ch 1, skip 1 st. Repeat from * across the row and finish with a puff st, ch 3 and turn.
- Row 2: * puff st in ch-1sp, ch 1. Repeat from * and make final puff st in the turning chain, ch 3 and turn.
- Repeat row 2 until you have reached the desired length and finish with ch 1 to close the final puff st. Break yarn and work away the ends.
Basket Weave Stitch
Basket weave creates a woven texture that looks like a basket. It uses chain and double crochet and consists of sets of front and back post double crochet stitches.and has a dense textured finish.
What is front post double crochet and back post double crochet? 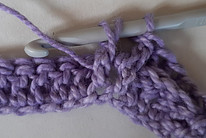 this is how to make these two stitches:
- Front Post Double Crochet (fpdc): to make a fpdc, yarn over (yo) and insert the hook from the front to the back, between the posts of the first and second dc of the previous row, and then from the back to the front, yo and pull the yarn around the post of the stitch.
- Back Post Double Crochet (bpdc): to make a bpdc, yarn over (yo) and insert the hook from the back to the front,
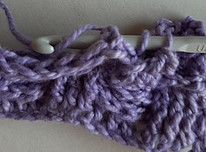 between the posts of the first and second dc of the previous row, and then from the front to the back, yo and pull yarn around the post of the stitch.
Basket weave stitch is done using a multiple of 6 stitches plus 4. For a scarf you can use 28, 34 or even 40 stitches or more, depending on the width you would like to have.
For my sample piece I used 22 stitches ((6 x 3)+4), so start by making a chain of 22 stitches: 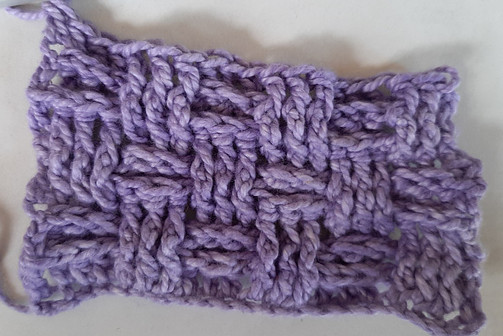
- Row 1: dc in the 4th ch from the hook, dc in each ch to the end, ch 3 and turn
- Row 2: skip the 1st dc * fpdc in next 3 sts, bpdc in next 3 sts, repeat from * to the end, dc in top ch of turning chain, ch 3 and turn.
- Row 3: repeat row 2
- Row 4: skip 1st dc * pbdc in next 3 sts, fpdc in next 3 sts, repeat from * to the end, dc in the top ch of the turning chain, ch 3 and turn.
- Row 5: repeat row 4.
- Repeat row 2 to row 5 until you have reached the size you want, break yarn without doing the ch 3 at the end of the final row. Work ends away.
Basket weave stitch is strong and suitable for use in items like reusable shopping bags and is a great meditative crochet stitch.
Star stitch
Star stitch is sometimes called “daisy” stitch or “spike cluster” as the loops resemble “spikes”. You only need to know two basic stitches to make star stitch, and that is half double crochet and chain stitch. You can make a star stitch with a varying number of spikes, but here we will work with 6 loops on the hook.
Your pattern will tell you how many stitches to start with, but to make a practice piece for star stitch, make a chain with an odd number of stitches. (I started with 17 st)
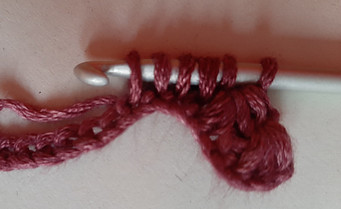
Row 1:
- to make one star involves several steps, so to make the first star, follow these steps
- insert hook in the 2nd chain from the hook, yo and pull yarn through, leave the loop on the hook to have 2 loops on the hook,
- insert the hook into the next ch, yo and pull yarn through to have 3 loops on the hook
- insert the hook into the following 3 chains and yo each time so that you have 6 loops on the hook,
- yo and pull through all 6 loops on the hook. The loops create the spikes on your start.
- Ch 1 to close and secure the star, which also creates an “eye” for the star. That is 1 completed star.
- To make the 2nd star:
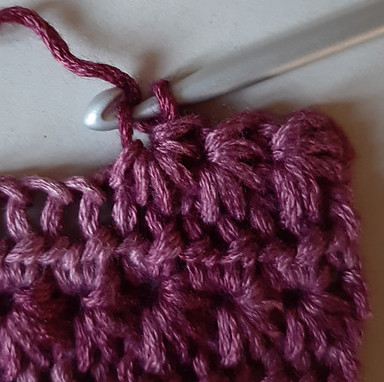
- insert the hook into the “eye” of the previous star, yo and pull yarn through to have 2 loops on the hook,
- insert the hook into the space between the last 2 spikes or loops of the previous star, yo and pull through to have 3 loops on the hook,
- next, insert the hook into the last chain stitch of the previous star, yo and pull yarn through to have 4 loops on the hook,
- insert the hook into the next chain, yo and pull yarn through to have 5 loops on the hook,
- insert the hook again into the next chain, yo and pull yarn through to have 6 loops on the hook,
- yo and pull through all 6 loops on the hook, ch 1 to close the star.
- Repeat these steps to make more stars to the end of the row, hdc in the last stitch and turn.
Row 2: ch 2 and make 2 hdc in the eye of the star in the row below. Continue with 2 hdc in each eye of the star and finish with 2 hdc in final stitch.
Row 3: ch 3,
- to make the first star of the row:
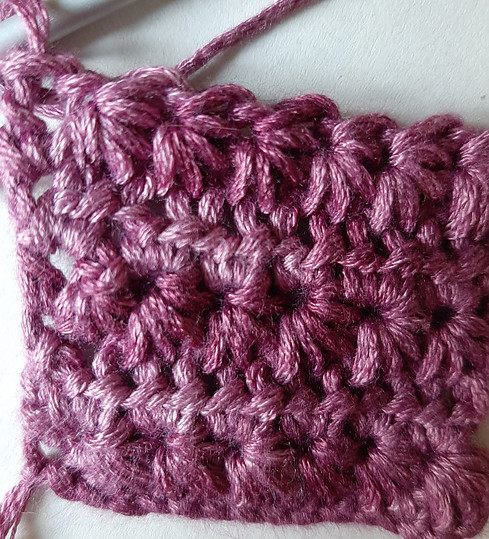
- insert hook into 2nd chain from hook, yo and pull yarn through to have 2 loops on the hook,
- insert hook into the next ch, yo and pull yarn through to have 3 loops on the hook,
- insert the hook into the next 3 stitches, each time yo and pull through, to then have 6 loops on the hook.
- Yo and pull through all 6 loops on the hook.
- Ch 1 to close the star.
- Complete the row with star stitches and finish with hdc in the last stitch.
Repeat row 2 and row 3 until you have reached the desired length, finishing with a hdc row. Break off yarn and work away edges.
Sc in the fastening ch of each star stitch across the row, sc in the top of the turning chain. Ch 3 and turn.
These two rows form the basis, so keep repeating row 2 and 3 until you have reached the desired length. End with row 3 as the final row and break off. Some patterns will indicate to do hdc instead of sc, so follow the instructions for your pattern.
Although the star stitch is not difficult, I personally find it a very awkward stitch. It is often difficult to see where to insert the hook, and specially between the 2 final spikes of a star. I prefer stitches that doesn’t require quite as much concentration on where to put the hook, so I’m not convinced that I would recommend this stitch for meditative crochet. Trying to find the correct spot for the hook can be frustrating and I find some other free crochet stitches to be quicker to make.
Camel Stitch
Learning to crochet camel stitch is quite easy as is it a variation of half double crochet.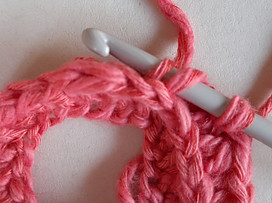 It has a very distinct look at resembles knitting and is another great stitch for meditative crochet.
When you make a half double crochet, there is an extra loop that is formed on the side of your work. In camel stitch, you crochet into that loop, which then pushes the top of the stitches to the front. The pushed stitches in the rounds of camel stitch look very much like the Vs in knitting.
Camel stitch is best done in rounds. To make a sample piece, start with a chain that can have any number of stitches. Form a ring by joining with a slip stitch in the first chain. Make sure that the chain is not twisted.
- Rnd 1: make a hdc in each ch, join with a sl st, ch 2 to start the next rnd.
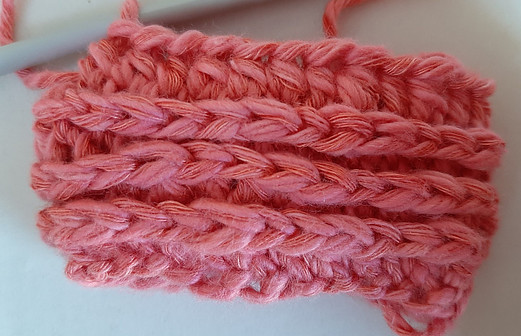
- Rnd 2: you would normally insert the hook through the V that is formed at the top of the stitch in the round below, but for camel stitch you insert the hook into the angled third loop below the V. To make a hdc into the 3rd loop, which is the loop below the V, yo and insert the hook into the 3rd loop, yo and draw yarn through, yo and draw through all 3 loops on the hook. Repeat to the end of the rnd. Join with sl st and ch 2 for the next rnd.
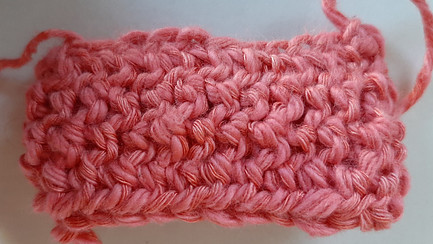
- Rnd 3 and successive rnds: repeat rnd 2 and after a few rnds you will start seeing the Vs that resemble knitting. In knitting the Vs would go up vertically, whereas in crocheting they run horizontally.
A different look, which is a more ribbed look, is created when camel stitch is done in rows.
Abbreviations
These are the abbreviations that you will come across in these directions for textured crochet stitches.
- bpdc = back post double crochet
- ch = chain
- ch-1sp = chain – 1 space which is the space that is created when there is a chain stitch in the previous row.
- dc = double crochet
- fpdc = front post double crochet
- hdc= half double crochet
- rnd (s) = round (s)
- sc = single crochet
- sl st = slip stitch
- st = stitch
- sts = stitches
- tr = treble crochet
- yo = yarn over
Explore more advanced crochet stitches for meditative crochet in this post. If you need yarns or hooks, this is where you will find a huge selection at very affordable and competitive prices, or alternatively get eco approved, cruelty-free yarn from Amazon, which has a good selection as well.
KnitPicks have beautiful gift ideas for crafters, together with kits and yarns and textiles.
I hope you have learnt from these free crochet stitches and will include textured crochet stitches in your next project. If you have any suggestions or questions, please comment below and I will get back to you.

Thank you so much for these new stitches to add to crochet projects. Having the steps clearly laid out helps a great deal and the pictures really help to visualize the project in advance. Do you also have a video channel (or some that you recommend people subscribe to)?
PS I really like the blue and purple colors you used — I can think of some beautiful projects I could do with those colors!!
Although I do follow some YouTube channels, I prefer having an actual book that I can refer to as well. Knit Picks do a great selection of books and yarn, so you can try them.
Darn Good Yarn also offer tutorials and have a great selection of yarns for all your knitting, crochet and craft projects.
I’m interested in sewing. At the age of 7/8, I learned to knit sweaters. Reading this article, after a long time, the desire for interesting sewing is awakening. I’m really interested in learning Puff Stitch and Basket Weave Stitch. It would be nice to discuss advanced crochet stitches in a little more detail.
One is never too old to learn new skills and crafts. You can explore advanced crochet stitches in this post here on Expand your skill with advanced crochet stitches.
I hope it helps you.
You have here an interesting post on crochet stitching. There’s more to it than I thought there would be. I always thought you ended the stitch at the end of each line. I’d have to go back to the basics for crochet. My grandmother always used to do crocheting, and the best way to describe it was that it was meditative in nature. If my fingers were more nimble, I’d try it myself. Well written. I would recommend this post to others.
Hi Anthony, you do end the stitch at the end of the row, and turn the work around for the following row. If you are working in rounds, you just mark the start of each row and continue while also increasing to keep it flat. Hope it helps, Liné
Thanks so much for sharing an article to know how the easy textured crochet stitches are made for my projects. I’m a huge crochet fan and I was looking for a good tutorial to make textured stitches, your article is one of the best on the internet, after reading it, I made a sampler and I should say is easy to follow the step by step you have here on your article.
I didn’t know the camel stitch was named this way, took me a while to find this stitch, can it be done on the end of a sleeve for a sweater?
You have a great website, I will book mark it so I can come back to read more post from you!
Thank you Alejandra and it is good to know that you could follow my instructions to make a sampler. You can indeed use the camel stitch on the end of sleeves, it will give a very nice textured edge to the sweater. All the best, Liné
Thank you for sharing the ideas on the “Easy textured crochet stitches”. They sound very easy, I wish they as easy to make. The “bobble stitch” is very beautiful and thick; I think it will make nice warm material for cold weather. I wonder if I could make a cardigan with the design. If yes, how long will it take me to complete a medium-size cardigan if I crochet 3 hours per day?
Hi Debbie, the bobble stitch is very chunky and uses a lot of yarn that I do not think it is the best choice for a cardigan.
I am so thankful I found your site. I used to crochet years ago for my little cousin. I crochet a dress when she was 1. Now she is 42. I totally forgot how to crochet and I was looking online on how to crochet again. Those sites are so confusing. The way you explained on your site is so easy. It jogged my memory and I am now ready to crochet again! I just bookmarked your site too! Thanks for this nice article!
Thank you for your kind comments Carole and I hope you will enjoy rekindling the craft, Liné
I don’t know anything about needle work however I will say that this site seems for those who are quite advanced in this hobby, is this correct?
This paragraphs were broken up into good sized chunks for reading. I like the bullet point instructions.
The pictures are beautiful and appear to give good instructive details.
It’s a really nice looking website. Well laid out. It if were a hobby or topic I were interested in I would spend more time on here.
Hi Jenny, Although this post is about textured crochet stitches, it uses basic stitches. There are many posts on the website which is for beginners, so suitable for any level of expertise and anybody who is interested in learning a new hobby or craft.
Thank you so much for these various textured stitches, they are easy to do and they can help me create better designs. the bobble stitch is very popular and widely used here.
this is like a whole new class that people can learn. i can practically follow and make a good work with you guidance. thank you.
Hi there, It is good to hear that the free crochet sticthes will help you to create better designs. The bobble stitch creates a lovely chunky texture, it just uses a lot of yarn. Instead of using the stitch for a big project like a blanket, you can incorporate it in panels or blocks to add variety to the blanket. Or incorporate it in smaller projects like a beanie.
My crochet skills is not at the best at the moment and this is not because i recently started learning but because i have not had the time to keep on practicing. i think that with ideas like this and new things to explore i can be more engaged and improve my self. thank you very much for this.
As with many crafts, the more you do it, the better you become at it. But the important thing is that you need to enjoy it as well. I find crochet relaxes my mind and body
My mother recently started to re-learn how to crochet and she LOVES it. She made me this amazing blanket, with a super-easy stitch, too, I’m sure, but it is gorgeous! She’s currently onto doing my brother’s blanket. I’ll have to share your website with her, so thank you! This was very helpful!
Thank you for your kind comments. A crocheted blanket is great and actually very easy, it just takes time if you make a big one. Crochet is a very relaxing craft and most stitches are good for meditative crochet